Sunday, December 22, 2013

HOW TO: Clean Silver Plated Jewelry

A while back I bought some silver plated bangles that now have this yellowish tint to them.
To clean them I used a trick I learned a way back when from good ole television. 
 I've done this loads of times and it works like a charm every time.
 It's fast, easy and cheap! 

What You'll Need:
It really quite simple, all you need is...
TOOTHPASTE! 
(I used colgate whitening) 

Directions:
1. Grab your dull/discolored silver

2. Using an old toothbrush (soft bristles), brush on some toothpaste. Make sure you really get into those nooks and crannies.
(If the jewelry is smooth simply rub on the toothpaste)

3. Clean with water.

4. Dry with paper towel. 

It will shine like the first time you bought it! 
^.^
Enjoy


Tuesday, December 17, 2013

Happy Holidays!

Hi Guys! 

My little sister made this gingerbread house (with a little help from me).

Happy Holidays
^.^


Friday, December 6, 2013

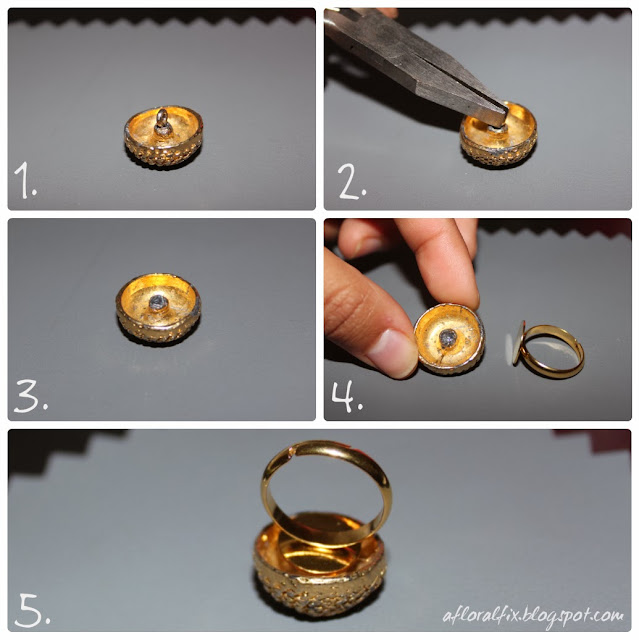
DIY: Button Ring

Hi! Here is a DIY on turning an old button into a fancy statement rings =)


You Will Need: 
Button
Ring Blank
E6000 Glue 
Nail File
Pilers

Directions

1. Take the piler tool and remove the shank from back of the ring.

2. Make sure the back of ring is flat. If not, use an old nail filer and gently grind it down.

3. Apply E6000 glue to the back of button (or on flat area of ring) and attach.

4. Let it dry for 24 hours. 

ENJOY ^.^

Fabric Tape Headband

Hello There 
^.^
If you're on pinterest you've probably heard of washi tape but have you heard about fabric tape?
I purchased some by accident (thinking it was washi tape) a few weeks ago.
I'm glad I bought them, they are really great. 
They come in a wide variety of patterns and you can use it to decorate pretty much everything.


Here I've use it to revamp an old and very purple headband.


Supplies
Headband
Fabric Tape

Direction:
Its simple --Just tape on the fabric tape on to the headband =)

Wednesday, December 4, 2013

DIY: Cleaning Slime

My keyboard is gross..I mean really gross. I can clean the surface but I can't seem to get rid of the crumbs between the gaps. 
I heard about this cleaning slimy gel sold on amazon which you place on the keyboard and it sinks into those gaps engulfing the dust and dirt. 
I was about to order it...then I thought can't I just make this stuff? 
Yes I Can and So Can You!


Step 1: Make your slime
Click Here for video on how to make the slime 
(it's really really easy! only 4 ingredients Borax, Water, glue, food color)


Step 2: Place on dusty/dirty surface. 


Step 3: Wait a few minutes. Then peel away and look at all the gunk it took out. 


Give it a try! What do you have to lose besides the dust/debris ?^__^


7 DAY NAIL CHALLENGE

So I have this bad habit of buying nail polish and hardly using them >.<...

My excuse - I'm lazy and I have no time. 

No longer is that a good excuse. 

That's why i'm doing this nail challenge! 

I will try to create 7 nail looks for 7 days. 

^_^
-----------------------------------------------------------------------------------
DAY 7

Queen of Beauty (Sinful Colors) + Silver Nail Polish

DAY 6

Midnight Blue (Sinful Colors) + Innocent (Sinful Colors)

DAY 5

Dancing Nails (Sinful Colors) + Pink Nail Polish (So old doesn't even have a label)
Used bobbin pin to create dots
DAY 4

Last Chance (Sinful Colors) + Red Nail Polish (forever21)

DAY 3

Easy Going (Sinful Colors) + Black Nail Polish
I did 2 versions of this


DAY 2

Royal Rebel (Julie G) + The Golden Age (Sephora by OPI)

DAY 1

Grey Nail Polish (forever21) + Lights, Glammer-a Action! (Sephora by OPI)

If you would like a nail tutorial please let me know =)